The first meal I ever cooked on an open fire was rice, and it was terrible. Burnt on the bottom, raw in the middle, and full of ash. Most of what I learned after that came from my aunt, and the rest from a rocket stove made out of a paint tin.
An open fire sends most of its heat into the sky. A rocket stove sends it into the pot. It uses about a third of the wood an open fire needs, and I have cooked for six people on the twigs from one dead branch. When the gas runs out and firewood is all there is, that difference adds up fast.

How it works
Instead of an open fire, the flame burns inside a short, insulated chimney. The chimney pulls air through the fire, so the wood burns hot and fast and almost all the heat goes straight up into the bottom of the pot. Only the tips of the sticks burn; you push them in as they go. The gap between the pot and the chimney is small, so the hot gas has to scrape past the pot on the way out instead of wandering off.
Three things matter. Get these right and the rest is detail:
- Insulation that keeps heat in the chimney. Wood ash, vermiculite or pumice. Not sand, not soil; they soak up the heat and the stove never gets hot enough.
- Air under the sticks. The sticks sit on a shelf in the feed tube with air passing underneath. That is where the draught comes from.
- A small gap under the pot. About two centimetres above the top of the chimney, on three bolts or stones, so the gas can get out.
What you need
Difficulty: medium. Time: two to three hours the first time, one hour the second. Cost: free to the price of a meal.
- One 20-litre metal drum or paint tin with a lid, about 30 cm across: the body.
- One 10 cm steel stove-pipe elbow, or two empty 10 cm food tins (the 1 kg size): the L-shaped chimney.
- Three M8 bolts with nuts, about 60 mm long, to hold the pot.
- A bucketful of insulation: dry wood ash, vermiculite or crushed pumice.
- A strip of tin 10 cm wide, long enough to go round your pot: the skirt.
Tools: tin snips, work gloves, a marker, a hammer and a big nail or a drill, pliers.
Build it in ten steps
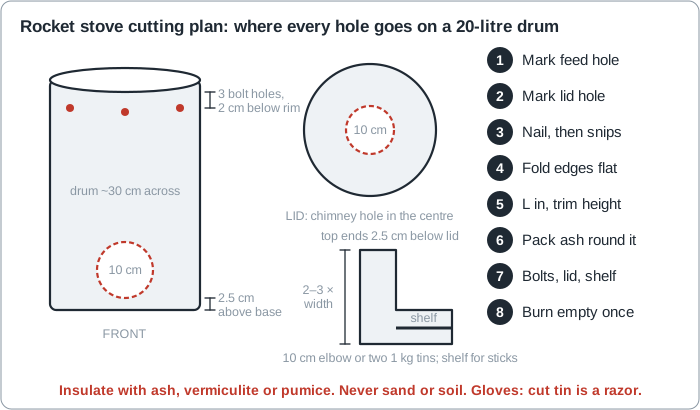
- Mark the feed holeDraw a 10 cm circle on the side of the drum with its bottom edge 2.5 cm above the base.
- Mark the chimney holeDraw a 10 cm circle in the centre of the lid.
- Cut both holesPunch a nail hole, then cut both circles with the snips. Fold the cut edges flat.
- Make the LPush the elbow together, or cut one tin into the side of the other, so one arm points up and one points out through the feed hole.
- Set the heightFit the L into the drum with the top of the upright 2.5 cm below the lid. The chimney should be two to three times taller than it is wide: 20 to 30 cm for a 10 cm pipe. Trim if tall.
- Pack the insulationPack the space round the L with dry ash or vermiculite, tapping it down, to within 2 cm of the top. Never sand or soil.
- Fit the pot boltsDrill three holes 2 cm below the rim, evenly spaced, and fit the bolts pointing inward. The pot sits on these, a finger's width above the chimney.
- Lid and stick shelfPut the lid on. Fit a short shelf of tin halfway up the feed hole so the sticks rest on it and air flows underneath.
- Make the pot skirtWrap the tin strip round your pot with a 1 cm gap, so the hot gas has to scrape past the sides.
- Burn it emptyLight it outside, empty, for half an hour to cook off any paint before food goes near it.
Outdoors or under an open roof only. It burns cleaner than an open fire but still makes carbon monoxide, and a stove this small is easy to carry into a kitchen. Don't. Keep a bucket of water beside it. Cut tin edges are razors: gloves on, and fold or hammer every edge flat before you call it finished.
Cooking on it
Push only the tips of the sticks into the fire and feed them in as they burn. The stove roars, which is where the name comes from. A litre of water boils in a few minutes on dry wood. With a lid on and the skirt fitted, a pot of rice for four cooks on a bundle of sticks the thickness of your wrist.
The stove is half of it. The habits are the other half:
- A lid on every pot. This one rule saves more fuel than anything else.
- Soak first. Rice, dhal and beans cook faster soaked.
- Simmer, don't boil. Once a pot is boiling, more heat only turns water into steam. Pull a stick out.
- One pot. Rice on the bottom, vegetables on top.
- Dry wood only. Wet wood spends its heat boiling off its own water.
It also makes the most fuel-hungry job in a crisis cheaper. Boiling drinking water for one minute, the surest way to make water safe without electricity, takes a handful of twigs instead of a log.
Limits
It needs small, dry sticks, not logs. It cooks one pot at a time. The insulation settles after a few weeks, so top it up. Ash insulation gets wet and useless if the stove is left in the rain; keep it under cover.
And build it now, on an ordinary Saturday. A rocket stove built in a crisis, in the rain, by someone who has never cut a tin, takes a day and comes out crooked. Build it badly, use it for a week, fix what annoys you. Then, when the gas runs out, you are not learning. You are just cooking.
Rocket stove
- Insulated chimney: ash, vermiculite or pumice. Never sand or soil.
- Stick tips only, on a shelf, air underneath.
- Pot 2 cm above the chimney.
- Outdoors or under an open roof. Bucket of water beside it.
